【Unity】Job System 大量のオブジェクトを並列処理で高速化しよう
はじめに
こんにちは、情熱開発部プログラム2課の辻野です。
5/13公開とのことで新卒の方は入社から1ヵ月半ほどになりますね、新人研修でいろんな技術に触れる機会があったのではないでしょうか。
学生の時には意識していなかったことが、実務の開発現場では重要になる局面が多々あります。
今回はその代表例である「最適化」を、UnityのJob Systemで実現してみます。
大量のオブジェクトをマルチスレッドで効率的に処理していきましょう。
※Unity 6000.4.1f1を使用
大量のオブジェクトを扱ってみる
まずはJob Systemを適用するためのサンプルプロジェクトを用意します。
最適化時に効果が分かりやすいよう、ホーミング弾を1000発射するようにしてみます。
using System.Linq;
using UnityEngine;
using UnityEngine.InputSystem;

// ホーミング弾を発射するエミッタ
public class Emitter : MonoBehaviour
{
    // ホーミング弾のPrefab
    [SerializeField] private HomingProjectile prefab;

    // ホーミング弾の追尾目標
    [SerializeField] private Transform target;

    // 一度に発射するホーミング弾の数
    [SerializeField] private int emitCount;

    // ホーミング弾が着弾するまでの秒数
    [SerializeField] private float timeToHit;

    private HomingProjectile[] projectiles;

    void Start()
    {
        // ホーミング弾をemitCount分生成
        projectiles = new HomingProjectile[emitCount];

        for (var i = 0; i < projectiles.Length; ++i)
        {
            projectiles[i] = Instantiate(prefab);
        }
    }

    void Update()
    {
        // Spaceで全弾発射
        if (Keyboard.current.spaceKey.wasPressedThisFrame)
        {
            foreach (var projectile in projectiles)
            {
                // 初速度を持たせることで追尾軌道に幅を持たせる
                var inertia = Random.onUnitSphere * Random.Range(1.0f, 10.0f);
                projectile.Configure(transform.localPosition, timeToHit, inertia);
            }
        }

        // ホーミング弾の座標更新
        foreach (var projectile in projectiles)
        {
            projectile.ManualUpdate(target.localPosition, Time.deltaTime);
        }
    }
}
using Unity.Mathematics;
using UnityEngine;
// ホーミング弾
public class HomingProjectile : MonoBehaviour
{
[SerializeField] TrailRenderer trailRenderer;
// 衝突するまでの秒数
private float timeToHit;
// 加速度
private Vector3 acceleration;
// 速度
private Vector3 velocity;
// 発射前の状態を設定
public void Configure(Vector3 position, float timeToHit, Vector3 inertia)
{
transform.localPosition = position;
this.timeToHit = timeToHit;
velocity = inertia;
// Trailもリセット
trailRenderer.Clear();
}
// 目標(target)に向かってdt分移動させる
public void ManualUpdate(Vector3 target, float dt)
{
var position = transform.localPosition;
switch (timeToHit)
{
case <= 0.0f:
// 衝突済みなら座標更新はしない
return;
case <= 0.01f:
// 残り時間が限りなく小さいなら目標に到達したことにする
timeToHit = 0.0f;
velocity = Vector3.zero;
transform.localPosition = target;
return;
}
// 指定された秒数で目標に衝突するための加速度を求める
var diff = target - position;
acceleration = (diff - velocity * timeToHit) * 2.0f / (timeToHit * timeToHit);
// 揺れながら進むようにノイズを追加
var n = Vector3.zero;
var noiseUV = 0.1f * position;
n.x = noise.snoise(noiseUV + 10.0f * Vector3.right);
n.y = noise.snoise(noiseUV + 10.0f * Vector3.up);
n.z = noise.snoise(noiseUV + 10.0f * Vector3.forward);
n *= 6.0f;
timeToHit -= dt;
// 座標更新
velocity += acceleration * dt;
velocity += n * dt;
transform.localPosition += velocity * dt;
}
}スペースを押下すると1000発のホーミング弾が発射されます。
実際に発射してみると以下のようになります。
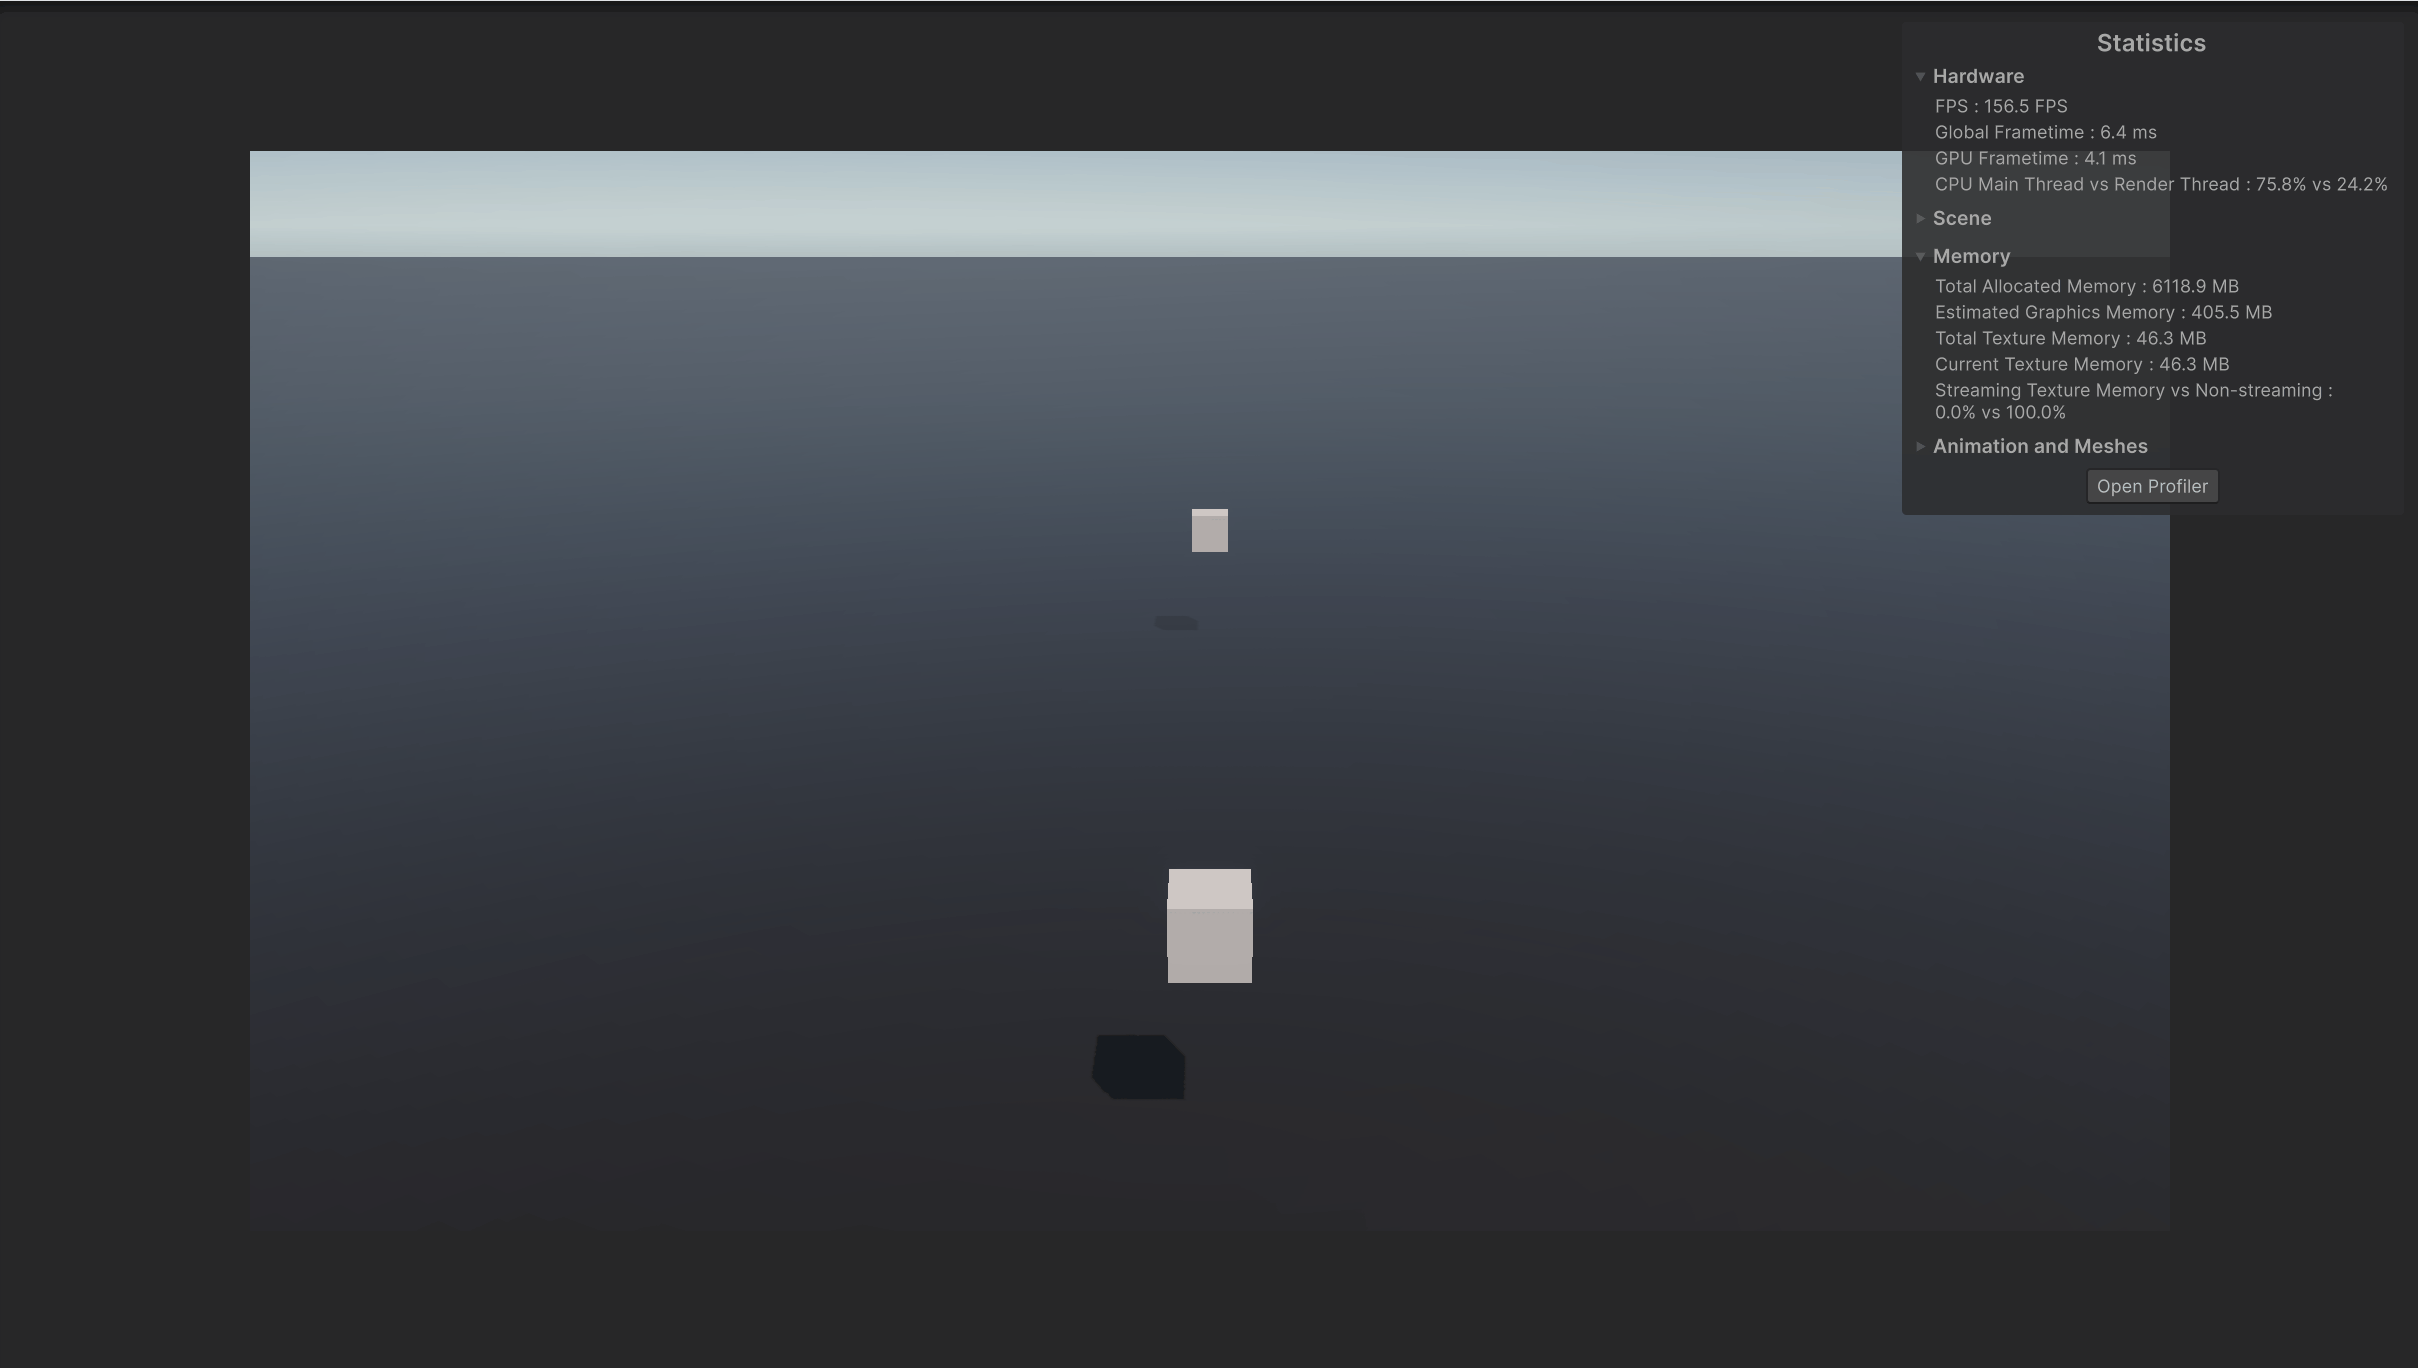
ホーミング発射するだけのコードですが、1000発出しているので177→54fpsとピーク時に大きく低下しています。
UnityのProfilerでも確認してみましょう。
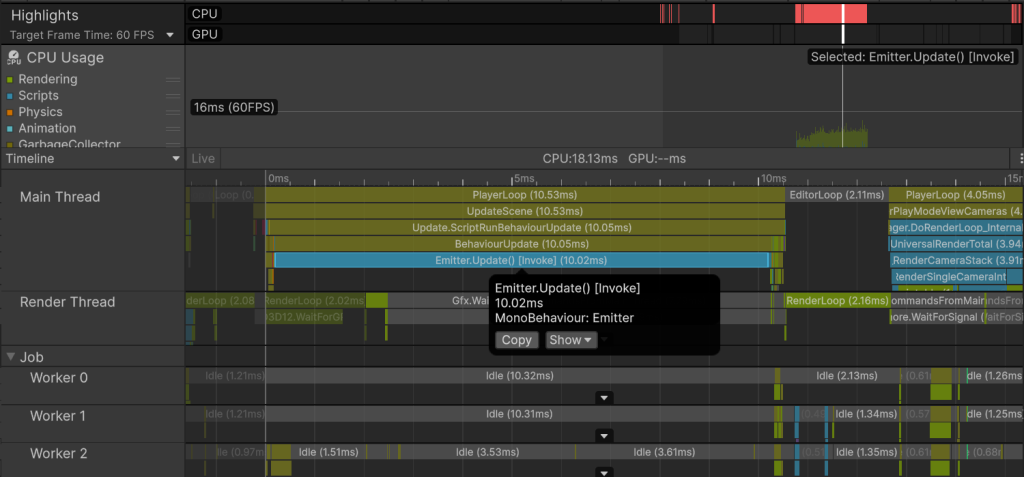
10.02msかかっていますね。
発射していないときは約0.6msになっているので、9.4msはホーミング弾の座標更新に使われていることになります。
120fps程低下するのでどうにかしたいですが、ホーミング弾の数を減らすのはレベルデザインにも影響するため他の方法を考えてみます。
Profilerを見てみるとワーカースレッドがほとんどIdle状態になっているようです。
メインスレッドの処理を分担することでfpsの向上を目指してみます。
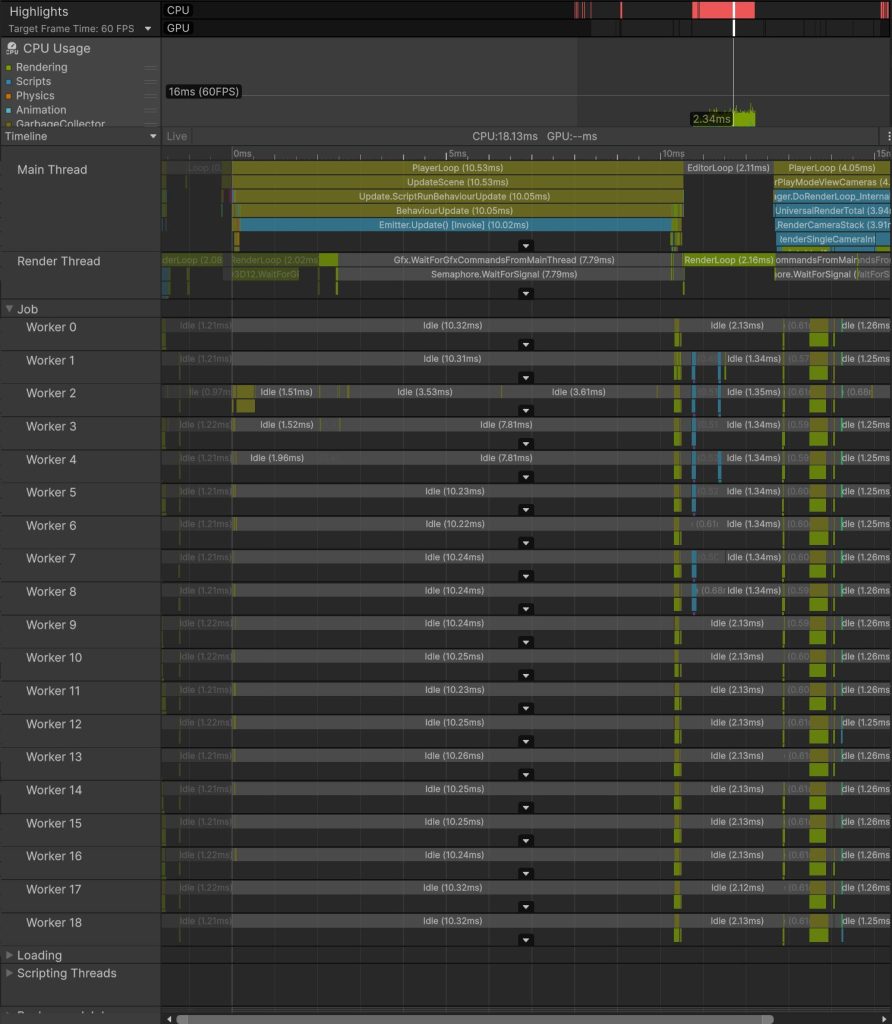
9.4ms ÷ 19(スレッド数) = 0.49ms
単純計算ですが並列処理によって負荷削減が期待できます。
※実際にはスケジューリングやメモリアクセスのコストがあるため理論値通りにはなりません
Job System
C#では並列処理を実現する方法としてC# Taskなどがありますが、UnityではJob Systemが扱えます。
下記によって、C# Taskよりも高速化された並列処理が可能なので最適化を行う際はJob Systemの利用が有効です。
- 扱うデータを値型のみに制限することで安全な並列実行を実現
- 入出力にはNativeArrayを利用する
- GameObjectやComponentの参照はできない
- Transformのみ間接的にアクセスできる仕組みがある
- ワーカースレッドへのタスク分配を自動調整してくれる
- Burstコンパイラによって実行命令が最適化される
またJob Systemでは実行する計算のことをジョブと言い、Unityでは特定のインターフェースを実装することで定義可能です。
基本的なインターフェースの種類は下記。
- IJob: 一つのスレッドで一つのタスクを実行
- IJobParallelFor: 複数のスレッドでタスクを並列実行
- IJobParallelForTransform:
IJobParallelForにTransformを操作できるようにしたもの - IJobFor:
IJobParallelForと同じだがジョブが並行実行されないようにスケジュールを設定できる
今回はミサイルの座標更新を並列処理したいのでIJobParallelForTransformを利用します。
ミサイルをJob Systemで実行する
それではミサイルを実装していた箇所をJob Systemで置き換えてみましょう。
Job Systemの制約に合わせて、コードを手直しします。
using Unity.Collections;
using Unity.Jobs;
using UnityEngine;
using UnityEngine.InputSystem;
using UnityEngine.Jobs;

// ホーミング弾を発射・管理する
public class Emitter_Job : MonoBehaviour
{
    // ホーミング弾のPrefab
    [SerializeField] private HomingProjectile_Job prefab;

    // ホーミング弾の追尾目標
    [SerializeField] private Transform target;

    // 一度に発射するホーミング弾の数
    [SerializeField] private int emitCount;

    // ホーミング弾が着弾するまでの秒数
    [SerializeField] private float timeToHit;

    private HomingProjectile_Job[] projectiles;

    // ホーミング弾の座標更新に用いるパラメータ群
    private TransformAccessArray transformAccessArray;
    private NativeArray<float> timesToHit;
    private NativeArray<Vector3> velocities;

    // 実行中のジョブのハンドル
    private JobHandle jobHandle;

    void Start()
    {
        // ホーミング弾をemitCount分生成
        projectiles = new HomingProjectile_Job[emitCount];
        var transforms = new Transform[emitCount];

        // NativeArrayを使いまわすので永続的なメモリ(Allocator.Persistent)として確保
        // Allocator.Persistentで確保する場合Disposeしないとメモリリークする
        timesToHit = new NativeArray<float>(emitCount, Allocator.Persistent);
        velocities = new NativeArray<Vector3>(emitCount, Allocator.Persistent);

        for (var i = 0; i < emitCount; ++i)
        {
            projectiles[i] = Instantiate(prefab);
            transforms[i] = projectiles[i].transform;
        }

        // JobでTransformを操作するためにAccessArrayを作成
        transformAccessArray = new TransformAccessArray(transforms);
    }

    void Update()
    {
        // Spaceで全弾発射
        if (Keyboard.current.spaceKey.wasPressedThisFrame)
        {
            for (int i = 0; i < emitCount; i++)
            {
                // 初速度を持たせることで追尾軌道に幅を持たせる
                var inertia = Random.onUnitSphere * Random.Range(1.0f, 10.0f);
                projectiles[i].Configure(transform.localPosition);
                timesToHit[i] = timeToHit;
                velocities[i] = inertia;
            }
        }

        // ホーミング弾の座標更新ジョブの作成
        var job = new HomingProjectile_Job.HomingProjectileUpdateJob()
        {
            target = target.position,
            dt = Time.deltaTime,
            timesToHit = timesToHit,
            velocities = velocities
        };

        // ジョブをスケジュール
        // jobHandle.Complete()を呼ぶまでは即時実行されるわけではない
        jobHandle = job.Schedule(transformAccessArray);

        // スケジュール済みのジョブの完了を待つ
        // Completeで待機中 メインスレッドは更新を停止する
        jobHandle.Complete();
    }

    void OnDestroy()
    {
        // スケジュール済みのジョブの完了を待つ
        jobHandle.Complete();

        // 確保したネイティブメモリの解放
        if (timesToHit.IsCreated) timesToHit.Dispose();
        if (velocities.IsCreated) velocities.Dispose();
        if (transformAccessArray.isCreated) transformAccessArray.Dispose();
    }
}
using Unity.Burst;
using Unity.Collections;
using Unity.Mathematics;
using UnityEngine;
using UnityEngine.Jobs;

// ホーミング弾
public class HomingProjectile_Job : MonoBehaviour
{
    [SerializeField] TrailRenderer trailRenderer;

    // 発射前の状態を設定
    public void Configure(Vector3 position)
    {
        transform.localPosition = position;

        // Trailもリセット
        trailRenderer.Clear();
    }

    // 目標(target)に向かってdt分移動させるJob
    [BurstCompile]
    public struct HomingProjectileUpdateJob : IJobParallelForTransform
    {
        // 追尾目標の座標
        // 全てのホーミング弾で使いまわせるものはReadOnlyで定義
        [ReadOnly] public Vector3 target;
        [ReadOnly] public float dt;

        // 衝突するまでの秒数
        public NativeArray<float> timesToHit;

        // 速度
        public NativeArray<Vector3> velocities;

        // 目標(target)に向かってdt分移動させる
        public void Execute(int index, TransformAccess transform)
        {
            var timeToHit = timesToHit[index];
            var position = transform.localPosition;
            var velocity = velocities[index];

            switch (timeToHit)
            {
                case <= 0.0f:
                    // 衝突済みなら座標更新はしない
                    return;
                case <= 0.01f:
                    // 残り時間が限りなく小さいなら目標に到達したことにする
                    timesToHit[index] = 0.0f;
                    velocities[index] = Vector3.zero;
                    transform.localPosition = target;
                    return;
            }

            // 指定された秒数で目標に衝突するための加速度を求める
            var diff = target - position;
            var acceleration = (diff - velocity * timeToHit) * 2.0f / (timeToHit * timeToHit);

            // 揺れながら進むようにノイズを追加
            var n = Vector3.zero;
            var noiseUV = 0.1f * position;
            n.x = noise.snoise(noiseUV + 10.0f * Vector3.right);
            n.y = noise.snoise(noiseUV + 10.0f * Vector3.up);
            n.z = noise.snoise(noiseUV + 10.0f * Vector3.forward);
            n *= 6.0f;

            timeToHit -= dt;
            timesToHit[index] = timeToHit;

            // 座標更新
            velocity += acceleration * dt;
            velocity += n * dt;
            position += velocity * dt;
            velocities[index] = velocity;
            transform.localPosition = position;
        }
    }
}
ホーミング弾の座標更新をHomingProjectileUpdateJobに切り出しました。
Job Systemはデータ指向で設計されているため、少し慣れが必要です。
ホーミング弾ごとにジョブ構造体を生成するのではなく、ホーミング弾ごとにデータを用意する形になります。
ホーミング弾ごとのデータはNativeArrayで管理、共通のものはReadOnly属性で定義します。
それでは1000発のホーミング弾を射出してみます。
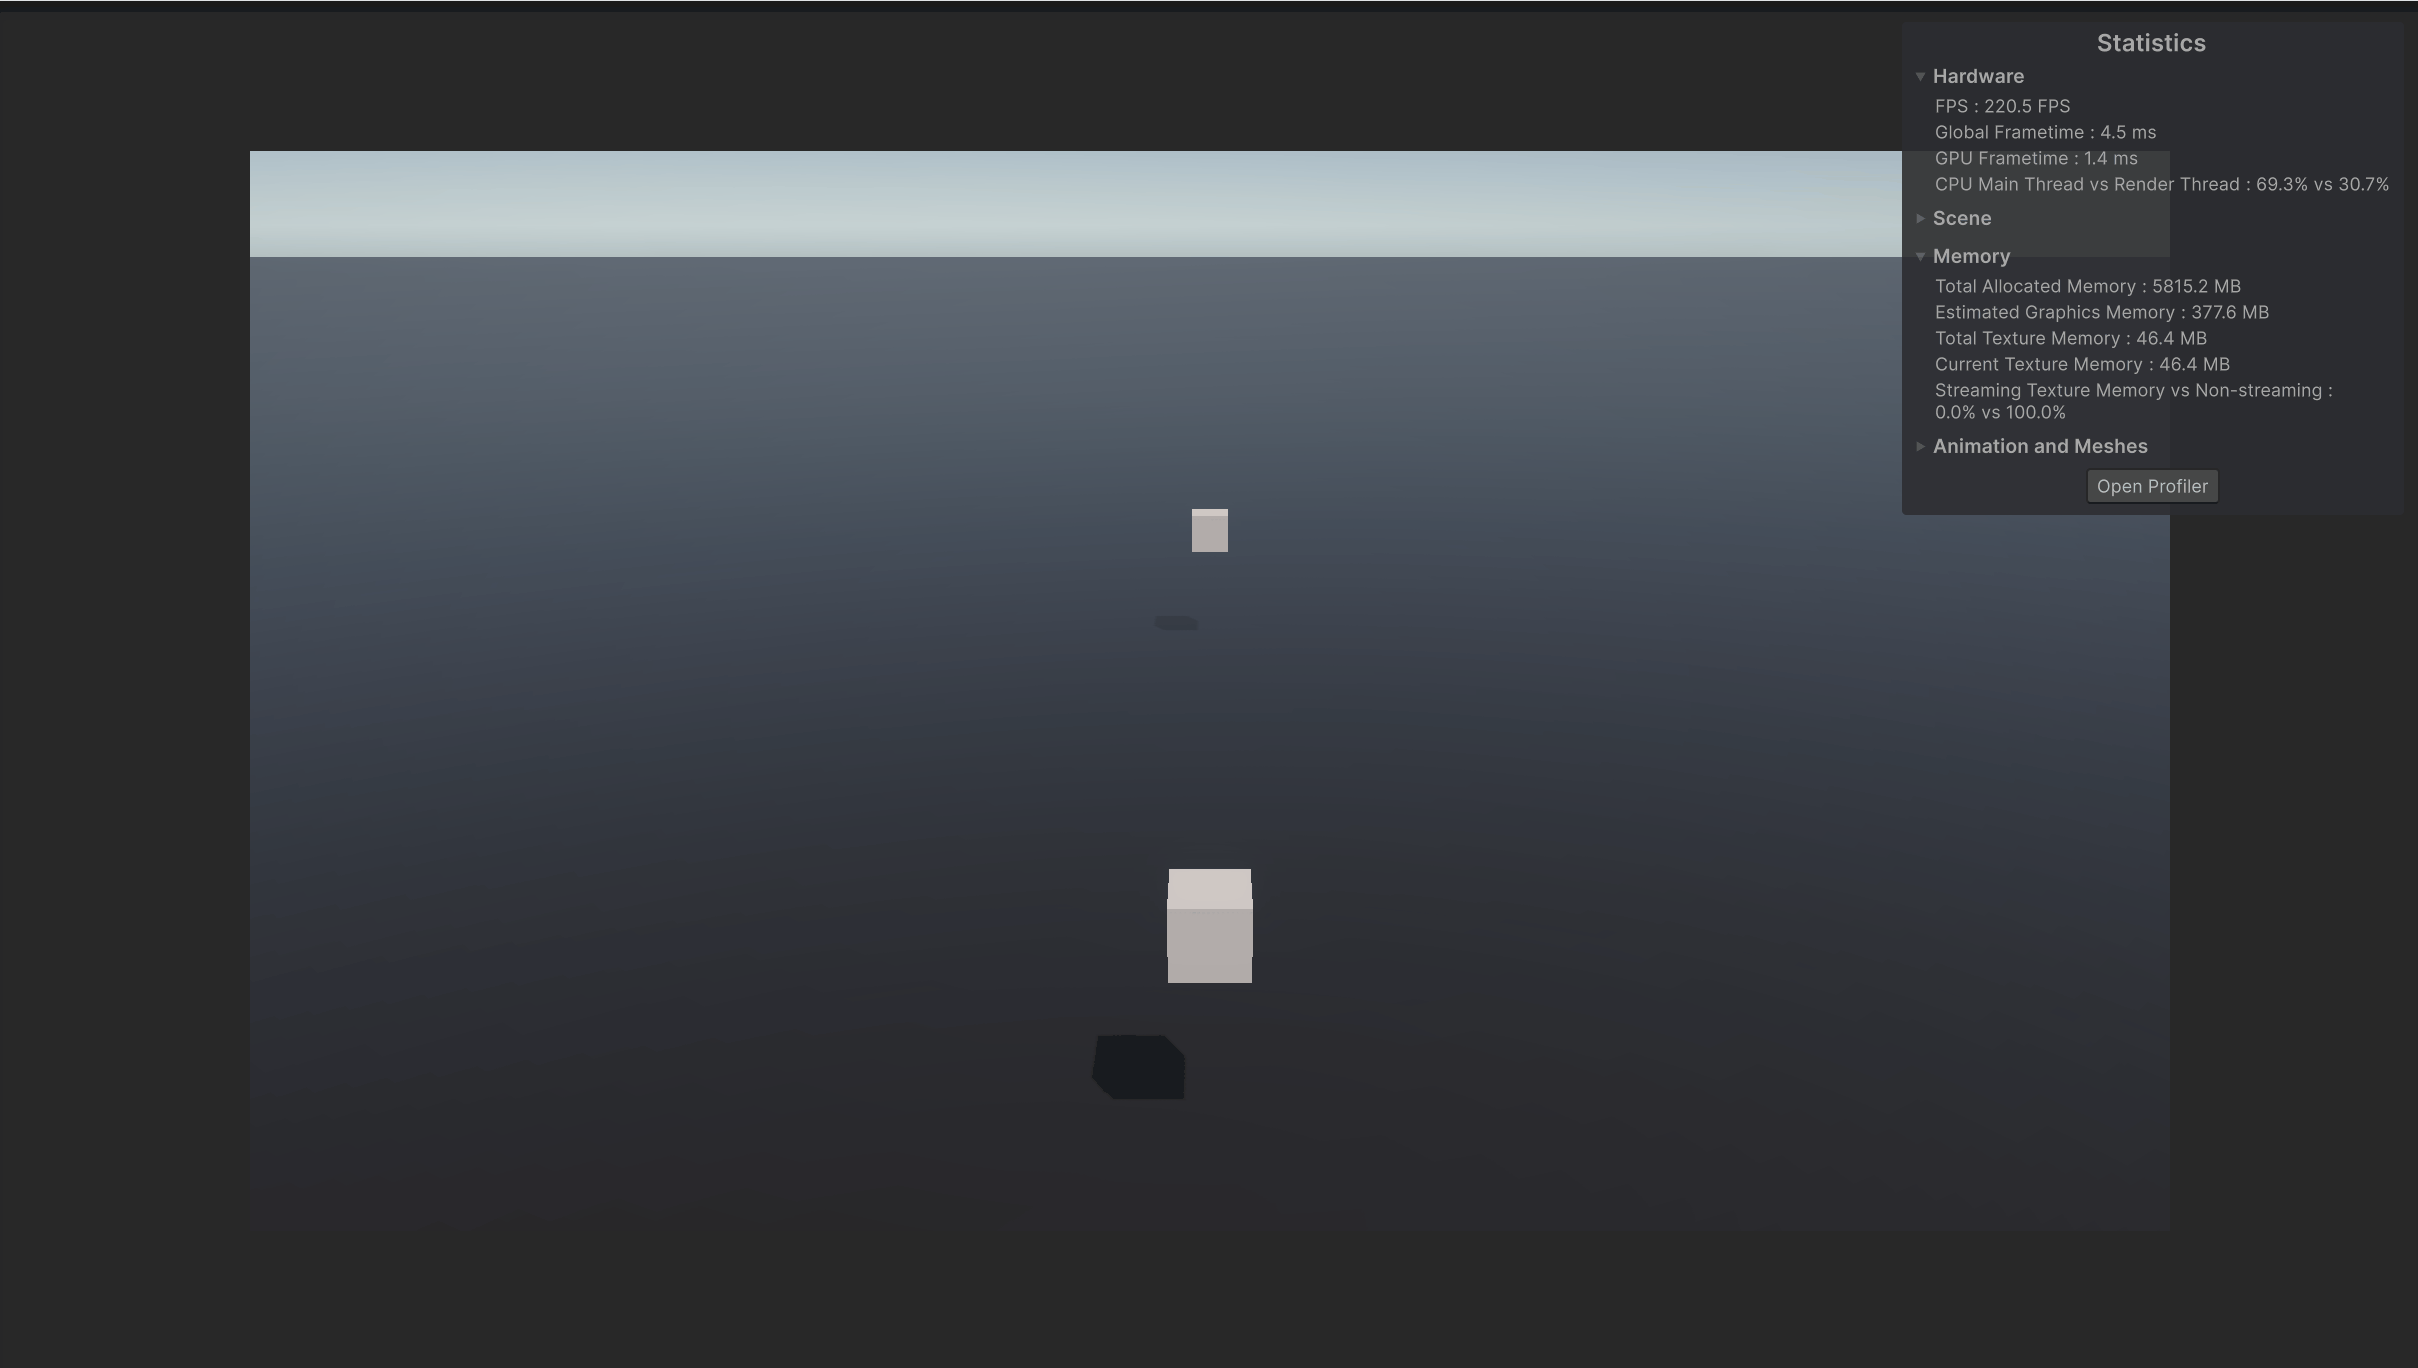
同じ挙動を維持したまま、97fps以上を確認できました。
Job System適用前の54fpsと比較して、43fpsの向上が確認できました。
Profilerでも見てみましょう。
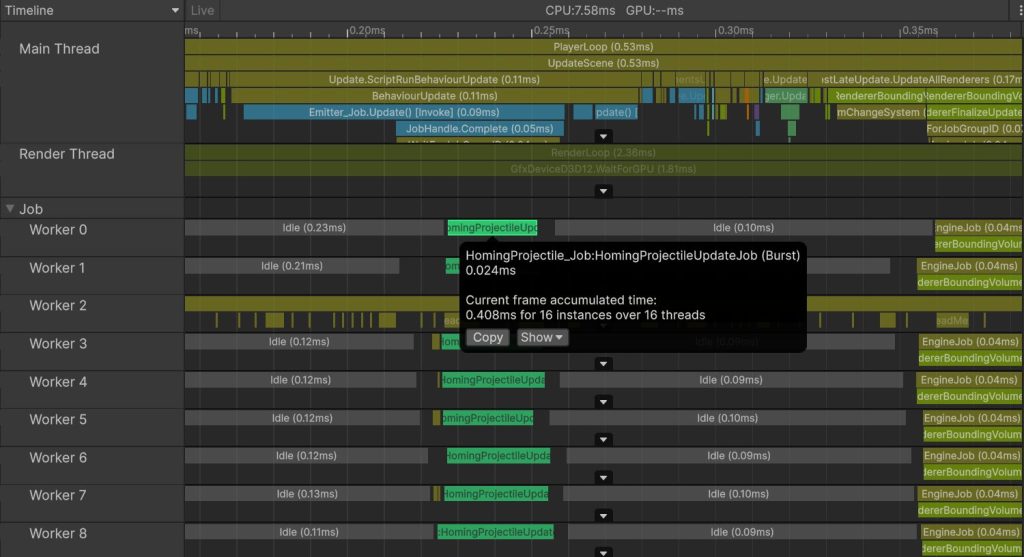
0.09msになっていますね。
ワーカースレッドで分散実行されているのも確認できました。
より最適化してみる
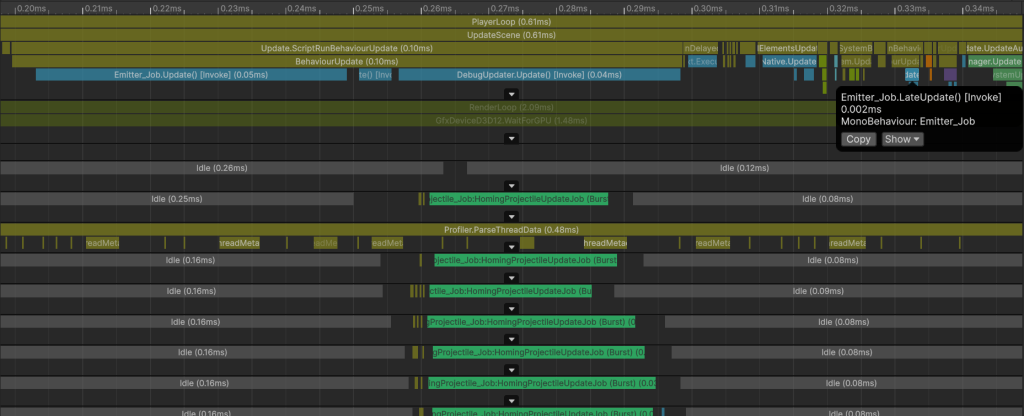
だいぶ早くなりましたが、同一フレームのUpdateでジョブの開始と終了を待機しているせいで、メインスレッドを止めてしまっています。
Emitter_Jobの後に実行されるUpdateが、Jobが完了するまで待機させられているのが分かります。

ジョブの終了待機をLateUpdateにずらすことで他コンポーネントのUpdateを実行できるようにしてみましょう。
// ホーミング弾を発射・管理する
public class Emitter_Job : MonoBehaviour
{
...
    void Update()
    {
        ...

        // ホーミング弾の座標更新ジョブの作成
        var job = new HomingProjectile_Job.HomingProjectileUpdateJob()
        {
            target = target.position,
            dt = Time.deltaTime,
            timesToHit = timesToHit,
            velocities = velocities
        };

        // ジョブをスケジュール
        // jobHandle.Complete()を呼ぶまでは即時実行されるわけではない
        jobHandle = job.Schedule(transformAccessArray);
    }

    private void LateUpdate()
    {
        // スケジュール済みのジョブの完了を待つ
        jobHandle.Complete();
    }
...
}
UpdateからLateUpdateにずらすことで、メインスレッドの待機時間がさらに短くなりました。
Complete実行前にジョブも終了しているので待機も発生していません。
まとめ
Unityで大量のオブジェクト処理を最適化する方法を紹介させていただきました。
43fpsもの負荷削減を実現でき、最適化の効果を存分に実感することができました。
並列処理は一気にパフォーマンスを上げることができる反面、実行順を担保する工夫がいるので初期段階で構想を練りたいですね。
またCPUの使用率が高くGPUが余り気味な場合は、ComputeShaderを選択してみるのも良いかもしれません。
参考文献
参考にさせていただいたサイト
- 誘導ミサイル完全マスター
- 【Unity】Trail Rendererを使って軌跡を光らせる方法
- 【Unity】NativeArrayを使いこなせ
- 【Unity】C# Job Systemを自分なりに解説してみる
- ジョブシステム(Unity公式ドキュメント)
【免責事項】
本サイトでの情報を利用することによる損害等に対し、
株式会社ロジカルビートは一切の責任を負いません。